Your Cart is Empty
Quick Answer: Assembling a Big Berkey Water Filter takes about 20 to 30 minutes the first time and comes down to five steps: clean the chambers, prime the filter elements, install the elements into the upper chamber with washers and wing nuts, attach the spigot to the lower chamber, and stack the two chambers together. Once primed, your system is ready to pour water through and start producing clean drinking water the same day.
We've been running a Big Berkey in our house for years, and we've walked hundreds of customers through their first setup over the phone and by email. The good news: the hardest part is usually the shipping box. Once everything is unpacked on your counter, the whole thing goes together with your hands and a measuring cup of water.
This guide is the assembly walkthrough we wish every new owner got tucked inside the box. You'll get the five-step sequence the instruction sheet covers, plus the priming tricks, common mistakes, and maintenance answers that keep a berkey water filter system producing clean water for years instead of months. If you're shopping and haven't pulled the trigger yet, our full lineup lives on the Berkey collection page.

Before You Start: What Should Be in the Box
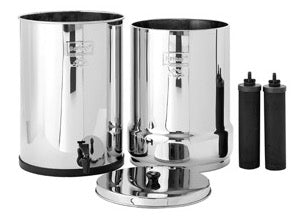
Before you start twisting wing nuts, lay every piece out on a clean dish towel so nothing rolls off the counter. A standard big berkey water filter kit ships with two polished stainless chambers (upper and lower), a lid with a knob, a stainless steel spigot with a rubber washer and threaded nut, two Black Berkey (BB-9) elements, two wing nuts with rubber washers, and two blocking plugs for any filter holes you're not using yet.
Count everything against the packing slip. If a washer or wing nut is missing, stop and call the retailer before you dunk anything in water. A loose washer is the single most common reason a brand-new system drips on the counter.
Nice to have on hand: a clean towel, a measuring cup, a permanent marker (for dating your elements), and a small bowl or empty pot big enough to catch priming water.
Step 1: Clean Up!
Your berkey water purifier is food-grade stainless, but it has been in a factory, a shipping container, and a warehouse before it got to you. Give both chambers, the lid, and the knob a warm, soapy rinse with a soft sponge. Skip anything abrasive — no steel wool, no scouring pads, no bleach. A drop of mild dish soap is plenty.
Dry the inside of both chambers with a clean towel, or let them air-dry upside down on a rack. Don't wash the Black Berkey or Phoenix filter elements themselves with soap. The micro-porous media inside each element will absorb soap residue and you'll taste it in your water for weeks. Elements only ever see clean water and, occasionally, a light scrub with a Scotch-Brite pad when flow rate drops.
While everything is drying, clear a spot on the counter where the finished unit will live. A Big Berkey is roughly 8.5 inches wide and 19.25 inches tall when assembled, so make sure you have vertical clearance under your upper cabinets. You'll be lifting the top chamber off daily to refill it — don't make your future self crouch.
Step 2: Prime the Black Berkey Filters
Priming is the step new owners skip and then email us about three days later wondering why their system drips instead of flows. Don't skip it. Priming pushes water through the micro-pores in each element to displace the air that got trapped there during manufacturing. Without it, the elements act like corks instead of filters.
Every Berkey element — whether you're running Black Berkey (BB-9) elements or the newer Phoenix elements — needs to be primed before its first use and any time you run the system completely dry for more than a few days.
Wet priming (the classic method): Each element comes with a black rubber priming button. Wet the element under the faucet, then press the button over the stem of the element and hold it tight against a faucet that fits snugly around the button. Turn on cold water at moderate pressure. Water will force its way backward through the element and you'll see beads of water sweating out of the white ceramic-like exterior. Keep the pressure on for 30 to 45 seconds until water is freely dripping off the entire outside surface.
The brown top priming method: If your element has the brown cap, the process is the same — the brown simply identifies the threaded top that seats into the upper chamber. Orient it correctly on the faucet and you'll see the "sweat-through" happen quickly.
If you don't have a priming button that fits your faucet: You can prime by submerging each element in a bowl of water for 15 minutes, but wet-priming with pressure is faster and more thorough. Don't run hot water through the elements — cold only.

Step 3: Insert the Elements
Now that your elements are fully primed and sweating water, it's time to install them in the upper chamber. A Big Berkey upper chamber has four filter holes — two in use (for the included pair of elements) and two you can "upgrade into" later by adding a second set.
For each element, stack the parts from the bottom up like this: element stem goes down through the hole in the upper chamber floor, rubber washer on the stem on the underside of the chamber, then the wing nut threaded up tight against the washer. Finger-tight is the rule. You are not torquing a lug nut — you're making a seal. If you crank the wing nut with pliers, you can crack the base of the element or distort the stainless.
The blocking plugs are not optional. Any filter hole you are not using must have a blocking plug installed with its own rubber washer and wing nut. An empty hole will leak unfiltered water straight down into your clean chamber and defeat the entire system. When you do upgrade to four elements down the road, keep the blocking plugs in your drawer — you'll want them if you ever run only two again.
Double-check every seal by gently wiggling each element. If anything spins freely, snug the wing nut another quarter turn. Once everything is seated, set the upper chamber aside.
Step 4: Attach the Spigot
The spigot goes on the lower chamber. Find the single pre-drilled hole near the bottom of the lower chamber. The order of parts, working from the outside in, is: spigot body, rubber washer, chamber wall, threaded nut on the inside.
Slide the rubber washer onto the threaded portion of the spigot, push the spigot through the hole from the outside of the chamber, reach inside with your other hand, and thread the nut on from the inside. Turn the spigot until it points straight down, then tighten the inside nut finger-tight while holding the spigot steady from the outside.
The spigot should be snug enough that a firm wiggle doesn't move it, but not so tight that you're stressing the threads. If you see any drip around the spigot when you do your first water test, take it apart and reseat the rubber washer — nine times out of ten the washer slipped off-center.
A quick tip on placement: if you plan to fill pitchers or water bottles directly from the spigot, park your Berkey on a sturdy riser (a wooden cutting board, a plant stand, or a purpose-built stand) so the spigot clears the lip of a quart jar. Nothing ruins the elegance of a gravity filter faster than having to tip a Mason jar sideways under the tap.
Step 5: Assemble the System
The last step is the easiest. Set the lower chamber on your counter where it will live. Lower the upper chamber straight down on top of it — the elements and wing nuts hang down into the lower chamber through the mouth of the lower chamber. There is no gasket and no locking mechanism; gravity and the weight of the water do all the work.
Place the lid on top of the upper chamber and screw the stainless knob on top of the lid if it arrived separate. The lid is important: dust, pet hair, and kitchen debris will otherwise settle in your source water.
Your first water test: Do not drink the first two full upper chambers. Fill the top chamber to the fill line with tap water, let it flow all the way through, then dump the filtered water from the lower chamber down the drain. Repeat one more time. This final flush removes any remaining carbon dust from manufacturing and confirms every seal is water-tight. On the third fill, you have drinking water.

Big Berkey vs Royal vs Travel: What's in the Box
If you're still deciding which size is right for your home, here's how the three most popular models compare out of the box. Filter element capacity and footprint are the two specs that matter most. This is a quick reference — for a full side-by-side against other filtration methods, see our Berkey vs Reverse Osmosis breakdown.
| Spec | Travel Berkey | Big Berkey | Royal Berkey |
|---|---|---|---|
| Capacity | 1.5 gallons | 2.25 gallons | 3.25 gallons |
| Filter holes | 2 | 4 | 4 |
| Elements included | 2 Black Berkey | 2 Black Berkey | 2 Black Berkey |
| Height x diameter | 18" x 7.5" | 19.25" x 8.5" | 23" x 9.5" |
| Best for | 1-2 people, RV, travel | 2-4 people, everyday home use | 4-6 people, busy households |
Assembly is identical across all three — the only thing that changes is how many blocking plugs you might need and how much counter space the footprint occupies.
What Your Berkey Actually Removes
We get this question at least once a week, so here's the honest answer. Published Berkey element performance data, combined with independent lab testing we've seen over the years, shows reduction of more than 200 common contaminants. That includes 99.9%+ reduction of pathogenic bacteria, cysts, parasites, heavy metals (lead, mercury, arsenic, chromium), pharmaceutical residues, VOCs, petroleum products, and chlorine.
Fluoride is a separate conversation. The standard Black Berkey element is not designed for fluoride removal. If fluoride is a concern for your household, the Phoenix element line adds fluoride reduction as part of its design, or you can add PF-2 post-filters onto the bottom of your Black Berkey stems. For a deeper dive on how gravity filtration actually works, we walk through the mechanics in Berkey Water Filters: How They Work.

Day-One Troubleshooting
Most first-day problems fall into three buckets. Here's how we diagnose them over the phone.
"It's leaking where the spigot attaches." Pull the spigot off, re-center the rubber washer on the outside of the chamber, and reinstall. If it still drips, the washer is pinched or torn — replacements are cheap and every full kit includes a spare.
"It's leaking where a filter sits." The wing nut isn't seated on a clean washer, or the washer slipped up the stem before you tightened it. Disassemble that element, make sure the rubber washer is flush against the underside of the upper chamber, and retighten finger-tight.
"Water flows painfully slowly." Nine times out of ten this is an incomplete prime. Pull the elements, re-prime them with the button until they sweat water across the whole surface, and reinstall. Flow rate for two fully primed Black Berkey elements in a Big Berkey should be around 3.5 gallons per hour with the upper chamber topped up.
Maintenance: Keeping Your Berkey Running for Years
A well-kept big berkey water filter is a 10+ year appliance. The stainless steel chambers will outlive you. The consumable parts are the elements and the rubber washers.
Berkey water filter lifespan: Each pair of Black Berkey elements is rated for approximately 6,000 gallons total — 3,000 gallons per element. For a family of four drinking about one gallon per person per day, that works out to roughly four years of use per pair. Phoenix elements have their own rated life; check the packaging for specifics.
Monthly cleaning: Wipe down the interior of both chambers with a soft cloth and warm water. If you notice a flow-rate drop before you hit the gallon rating, scrub the exterior of each element under running water with a clean Scotch-Brite pad (no soap) for 15 seconds per element, then re-prime and reinstall.
When in doubt, replace: If an element is more than five years old, has been dropped on a hard surface, or has ever been frozen, replace it. We stock everything on the Berkey replacement filters page. For a timing guide, we wrote When Is It Time to Replace Your Berkey Filters to help you read the signs.
A Quick Real-World Review After Five Years
If you're reading a big berkey water filter review looking for the "is this thing actually worth it" take, here's ours after years of daily use. We refill ours once a day in the morning, it produces clean, great-tasting water all day, and the only thing we've replaced is one set of rubber washers after seven years. The chambers still look new. We've run municipal tap water, rural well water, and once — on a power outage week — water straight out of a rain barrel (prefiltered through a coffee filter to pull the debris). The Berkey handled all three without complaint.
Is it the prettiest thing on a kitchen counter? That's taste. Is it the fastest? Gravity is gravity — you're not going to beat a pressurized system on speed. But for a countertop, off-grid-capable, no-electricity-required drinking water solution, we haven't found anything we'd swap it for.
Frequently Asked Questions
How long does it take to assemble a Big Berkey?
Plan on 20 to 30 minutes for your first setup, including cleaning the chambers and priming the elements. Priming is the slowest part — budget about 5 minutes per element. After the first assembly, refilling the upper chamber takes about 30 seconds and doesn't require any disassembly.
Do I need to prime the filters every time I refill the upper chamber?
No. You only need to prime Black Berkey (BB-9) or Phoenix elements once, before their very first use. You'll want to re-prime if the system sits completely dry for more than a couple of days, or if you notice the flow rate has crashed for no obvious reason. Day-to-day refilling just means pouring water into the top chamber.
Can I use a Berkey without priming the filters?
Technically the system will produce water, but flow will be so slow you'll think something is broken. Unprimed elements have pockets of trapped air that water can't push past. Priming forces that air out and opens up the full filtration surface. It's a one-time, five-minute job and it's not optional if you want the rated 3.5 gallons per hour flow rate.
How often should I replace my Berkey filters?
A pair of Black Berkey elements is rated for about 6,000 total gallons, which works out to roughly four years for a family of four. Phoenix elements have their own published life — check your packaging. We recommend dating each element with a permanent marker on install day so you always know where you are in its service life.
Can I put bleach in my Berkey to sanitize it?
Never put bleach, soap, or any chemical cleaner into the elements themselves — the carbon media will absorb those compounds and release them into your drinking water for weeks. You can sanitize the empty stainless chambers with a very diluted bleach solution followed by a thorough rinse, but do that with the elements removed. For routine cleaning, warm water and a soft cloth are all you need.
Ready to get your system up and running? Browse our full Berkey water filter collection for complete systems, or head straight to Berkey replacement filters if you're already set up and just need fresh elements. We ship every order from our own warehouse and we're happy to answer setup questions by email any day of the week.
